
Create-a-Concept: Post/Dig Variation + RB Rail
New series alert!

In an effort to continually bring exciting and engaging material for you guys, especially during the dreaded off-season, I wanted to add some new elements to the type of content you see on here. Starting today, I am beginning a new series called “Create-a-Concept” where, instead of breaking down film and examining plays that different teams have actually run, I will be taking a concept/play that I myself have created, break down each component of it, discuss what defenses it might have advantageous looks against, etc. Let me know if you guys enjoy this and want to see more of it in the future! Without further ado… let’s get down to it.
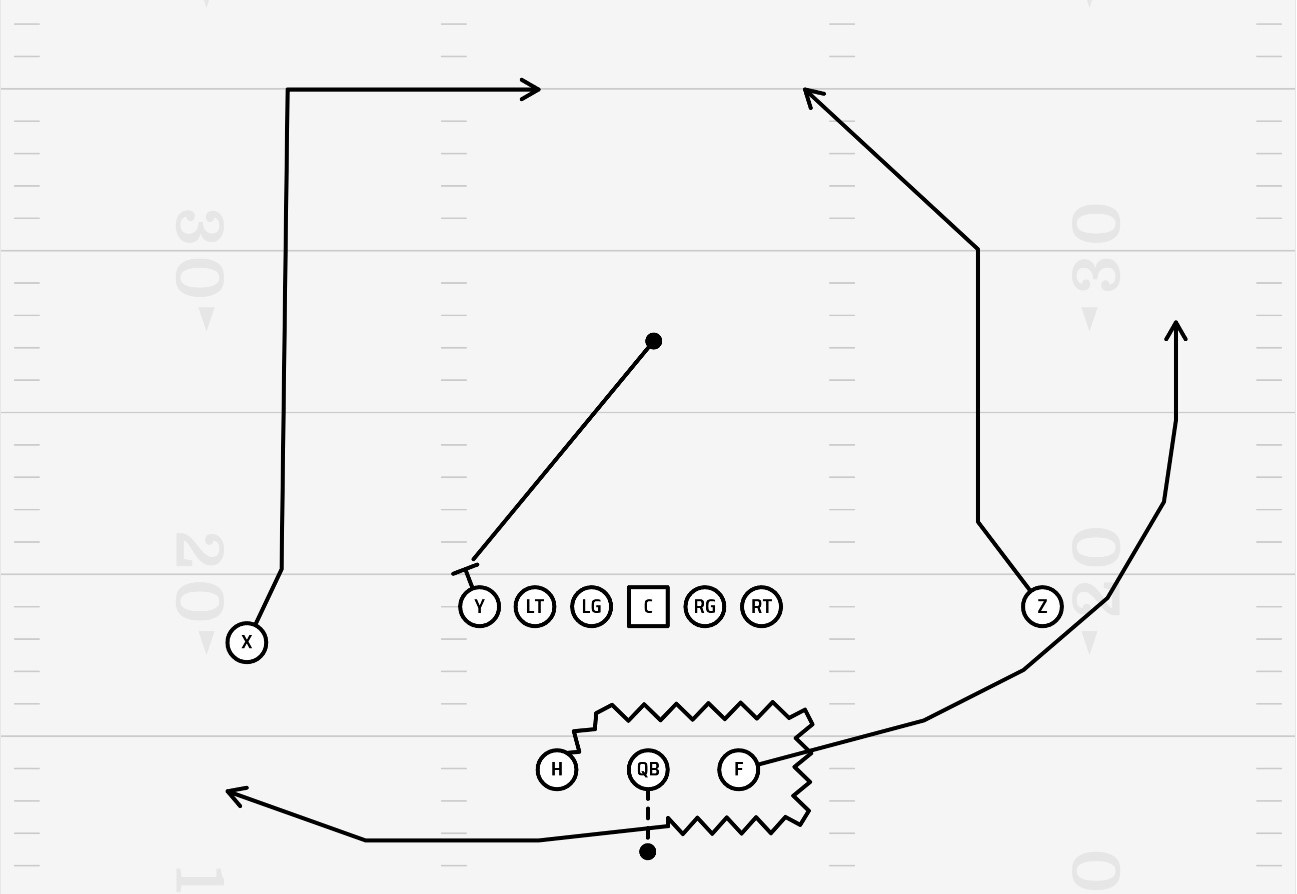
Play: Orbit Dig/Over + F Rail
Formation: Gun Split Pro Left
Personnel: 21 (2 RB, 2 WR, 1 TE)
Protection: Half-Slide (right) + Y Chip
This play is designed to be able to attack a myriad of zone coverage schemes. It’s still solid against certain man coverage looks. However, against looks like Cover 1 Robber, with the Robber safety being able to take any one of the three over-the-middle routes, this play would not be successful the majority of the time.
Pre-snap, the H goes in Orbit Motion, then releases on a Swing route after the ball is snapped. The F runs a Rail route which goes into the zone vacated by the Z on the Post/Over route. The Z stems inside and runs 10-12 yards before making his cut towards the post. On the backside, the Y chip blocks the defensive end, then runs 8-12 yards (depending on coverage) before sitting on the OTB route. The X receiver runs a Dig route, also stemming inside, and cutting at about 12-15 yards.
How it looks vs. common coverages…
The ideal defensive look against this play is Cover 2. Against Cover 2, the Post and the Dig stress the Mike and hook defenders. If the hook defenders widen, the X receiver can sit/settle in the soft spot of the zone. The Post, of course, also tests the MOFO (middle-of-field-open) coverage from the split safeties, especially if the Mike doesn’t carry deep. The Rail route exploits the hole between the flat defender and the deep right 1/2. The OTB route needs to sit at around 10-12 yards to sit between the hook zones and deep safeties. The progression for the QB against Cover 2 is Rail → Post → Dig → Check Swing → OTB. The QB takes a 3-step drop against a Cover 2 look in order to be able to get the ball out quick if the Rail is open.
Against Cover 3, this is still a good look, but the progression does change for the QB. His first read becomes the Dig route from the X, which should be run right around 12-14 yards to sit in the sweet spot between the 2nd and 3rd level defenders. The inside stem should also give him an advantage against the deep left 1/3 corner. If the Curl/Flat defender sinks, the Swing route should be open for an easy gain. However, if the hook defenders widen to the Dig and the flat bites on the Swing, the OTB should come open in the settle window for a nice gain. Sometimes, the Rail route can come open late if the F simply outruns his defender, but the ball should typically come out before the QB can even look his way. Against this coverage, the Post becomes more of a clear out route than anything else with MOFC. Also, the QB should take a 5-step drop instead of a 3-step in order to let the routes in his progression develop fully.
If the defense is in Cover 4, the primary read is once again the Dig, which is a great route to exploit Quarters coverage. The second read on this play becomes the OTB, which should shorten his route to 8-10 yards instead of 10-12 because the middle vacates quickly in Quarters coverage and the QB should look his way before checking down to the Swing. If the LB’s widen with the Dig or carry the Post, the OTB is your man. The Swing route is the 3rd in the progression and your safest option on this play. Commonly, in Quarters, the Middle Hook and Curl/Flat defenders will sink enough for this route to generate at least a few yards should the QB throw his way. The Rail route will commonly be blanketed vs. Cover 4 unless there’s a busted coverage, and the Post is primarily functioning as a way to hold the play side Quarters safety and open the window for the Dig and OTB.
If the defense is in Cover 1, it becomes about route separation and speed mismatches. The primary read goes back to being the F on the Rail route. This is a great mismatch vs. Cover 1, especially if a linebacker gets matched up on the running back. The second read is the backside Dig. Especially with the inside stem, the Dig route can get great leverage vs. man. The receiver should make his cut hard at 90 degrees to create the most separation. The OTB is the 3rd read vs. Cover 1, however the Y should not simply sit once he reaches his landmark. Instead, he should break off by either running it as an option route depending on whether his man has inside or outside leverage or run closer to 8 yards and break it off as a pivot route to the left, coming behind the vacated area left by the Dig. If no one else is open, or the defense sends a heavier rush, the Swing route is there as a final safety outlet. The idea is to get the ball out quicker vs. man coverage, so the QB will need to take a normal 3-step drop.
Finally, in the scenario that the defense looks like it is running Cover 0 blitz, all bets of “reading” the coverage is off. Unless the QB wants to get pummeled, he needs to get the ball, take one step, and get that sucker outta there. Any analysis of the defense needs to be done pre-snap if they are presenting this look. The Rail and the Swing are the primary two outlets on this play vs. Cover 0. The QB needs to read the defensive personnel/alignment and diagnose which player between the H and the F has the best mismatch, then get it to him as soon as he can after the ball is snapped. In some situations, if the QB feels comfortable making pre-snap adjustments, you can tag the X receiver to run a Speed Out or a Fade vs. this look, where the QB can still get the ball out quickly and exploit the coverage.
Thanks for tuning in to another edition of The Art of Offensive Football. If you’re new here, feel free to subscribe (for free) if you want to see more content like this. I’d love any and all feedback — let me know if you guys enjoyed this or if you want to see more content like it in the future! Anyways, see you on the next one.
Psalm 18:1-3
“I love you, O Lord, my strength. The Lord is my rock and my fortress and my deliverer, my God, my rock, in whom I take refuge, my shield, and the horn of my salvation, my stronghold. I call upon the Lord, who is worthy to be praised, and I am saved from my enemies.”